How to set up manualy Outlook 2010 for Office 365

Setting up Microsoft Outlook 2010 to work with Office 365 under normal cicumstances is a very straightforward process. There might be cases though where a manual configurartion is required. The aim of this article is to provide information on how to manually set up Outlook 2010 to connect to Office 365.
First step of the process is to identify the mailbox server address. To do so you will need to log in to Office 365 portal (www.office365.com). Once you log in, click on the Outlook link on the top of the screen and than click on the Help Menu (?) and select the About option. From the About page, make a note of Host Name, as highlighted on the picture below:
With this information you can proceed to setting up the account in Microsoft Outlook 2010. If a profile is already set up, open Outlook and navigate to File -> Account Settings, select the acount you need to update and click Change.
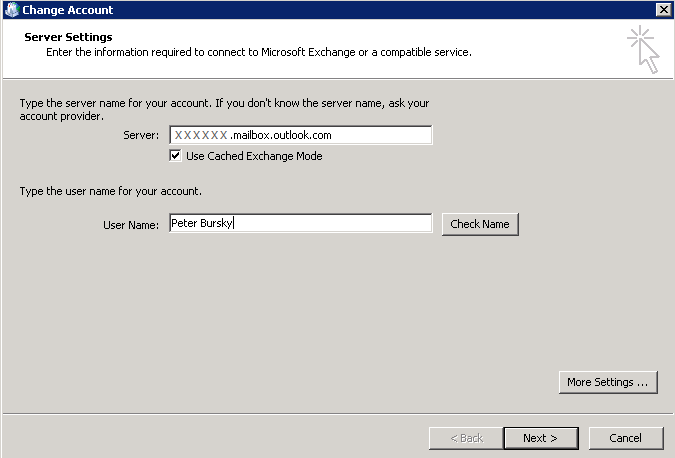
In the Server field you need to use the Host Server name from the Office 365 as follows:
Host Name (Office 365): XXXXXXXX.outlook.com
Server (Outlook 2010): XXXXXXXX.mailbox.outlook.com
(replace XXXXXXXX with the host name that you can find in the Help menu of the Office 365 portal)
Type in the username as well – in this case you can simply type in your full name.
Next click on More Settings . . and select the Connection tab. At the bottom of this screen select the Connect to Microsoft Exchange using HTTP option and click Exchange Proxy Settings. . .
On the Microsoft Exchange Proxy Settings paste in the Host Name to the URL filed for proxy server. Make sure the Connect using SSL only is selected. Also select Only connect to proxy servers that have the principal name in their certificate and type in msstd:outlook.com (see screenshot below):

Next select both options for connection type on fast and slow networks. Last but not least change the Proxy Authentication Settings to Basic Authentication. Save all settings clicking OK on Microsoft Exchange Proxy Settings and Microsoft Exchange as well. You will be back on the Change Account screen. Now click on Check Name and you should be prompted for a username and password. Type in your Office 365 username and password, tick the Save Password option and click OK. This should check all the setting are correct and the server name and user name should get underlined. You can click on Next now to finish the account change/setup.