SBS 2011 Essentials Office 365 Integration Add-In
With Microsoft pushing for clients to move some of their services to the cloud, they at least release tools that can help integrate these to on-premise IT systems.
One of their SBS 2011 editions – SBS 2011 essentials doesn’t come with Exchange 2010. But now you can use Microsoft’s Office 365 integration tool to manage the Office 365 account from the SBS 2011 Essential’s dashboard.
In this article i’ll attempt to take you through the process of configuring this i believe very useful tool.
To start open the SBS Dashboard. On the home screen on the Getting Started Task you will see a link to Set up Microsoft Office 365 Integration

When you click this link you will be presented with the Integration setup wizard

In this scenario we’ll presume you already have an Office 365 subscription, which means we tick the option “I already have a subscription for Office 365”. If you don’t have a subscription yet, obviously this option will remain un-selected and you will be able to set up an account as part of the wizard.
The next screen presented will be asking for Office 365 Account information

You will need to use a user account that has administrative rights in the Office 365 account.
The following screen will inform you about the requirement to use/apply strong password policy. This is to ensure the password “policy compatibility” between the local AD and the Office 365 system policy.

You need to select the “I understand … ” option to proceed, where you can see the progress of the setup.

When the setup is finished, the Dashboard will need to be closed to include the Office 365 Integration Add-In.

Next time the Dashboard is reopened you will see the new for Office 365

Another change you will see is under the Users tab. There is a new column there called Office 365 account. At the moment these values will be empty for all users as we haven’t linked the domain to office 365.

Finally when you click on the Office 365 tab you will see the options available for managing Office 365

The nest task to finalize the process is to link a domain to Office 365. This can be done using the link in the Tasks section on the right hand side.
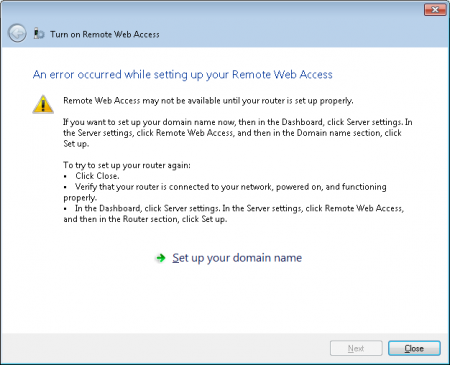
First you will need to turn on Remote Web Access for the server

You might get error message saying RWA might not work properly until the router is configure.

I suppose the wizard was attempting to use UPnP to configure the router, but if you call yourself an IT pro, you have disabled this feature of your router long ago.
Following the “Set up your domain name” link you can enter the domain name that i suppose you already own

Next you have the choice of setting up the domain automatically or manually. Unfortunately the automatic option works only with a very limited number of domain registrars, which means we’ll have to go for the option setting up the domain manually.

Next you will be informed that you need to setup the domain manually

On the following screen you will find information on how the DNS needs to be configured in order to finish the setup process

When the DNS is configured you will get a summary confirming that all requirements to link the domain to Office 365 are satisfied

And finally the confirmation that your domain has been successfully linked to Office 365

I hope this article will help you with any difficulties you would be having setting up the Office 365 integration on SBS 2011 Essentials. For any questions or notes please do not hesitate to use the post section below the article.